Wednesday 18 April 2018

Rainbowy goodness

You just know that any time you start a project and it starts with this:

...you are bound to enjoy the finished results.  A few years ago I joined Sew-Sisters' Kona Club.  Then I stopped for about 18 months because I felt like I had more fabric than brains.  However, one Aviatrix Medallion quilt, one Pointy Quilt and I felt the need to hop back on the train.  These are my colour-coded drawers now.

Anyhow....I digress....

So one of my nieces turned 11 earlier this year and if you know anything about 11-year-old girls, it's that they are OBSESSED with unicorns.  And this particular 11-year-old is also obsessed with rainbow-colour-order.  God love her.

Clearly, Lisa the Unicorn was on order.

I pulled a stack out of what I thought would work well for Lisa's mane, added in some metallic essex yarn-dyed linen for the background (because every unicorn needs to sparkle) and set to work.  If you have worked on a number of Elizabeth Hartman's patterns like I have, you might cut out all the pieces and think you are never going to finish and it is never going to work.  But then, by some miracle, it all seems to fit together lickety split!

That mane is my favourite part. And it left me with a really pretty rainbow ordered scrap.
It wasn't long before I had most of the pieces put together so I could get a vision of what the final product would look like.  Giant, sparkly excitement.

Then...before I knew it, the front of this massive floor cushion was done.
My grandmother (the other quilter in my family) helped my niece make a rainbow quilt this fall and I thought that a big floor cushion she can lay on the floor with a read would make a nice, coordinated addition to her room.  I quilted the background in teal swirls which looks cool with the metallic and then quilted her mane like hair.  


Mission accomplished.

Now I want to create my own herd of unicorns.  Totally unacceptable though...right?


So I made myself a Sparkly Sloth instead.  

Monday 29 January 2018

The Jess Quilt (or....The Bee Tranquilt)

Back when I was in thumb jail...wait.  Did I mention I'm out of thumb jail?  I'M OUT OF THUMB JAIL!!!!  There is still a very disturbing "popping" that occurs whenever I hinge my wrist forward but the pain is gone.  I'm freeeeeeeee!

Anyhoo...in November when I was in thumb jail, all I could do was collect and curate fabrics for projects that I would work on in the future when I was better.  One of these projects was for my brother's girlfriend (Jess) who is one of my current housemates.  Most evenings she wraps herself up in the VERY loved quilt that my grandmother made for my brother.  Its the one he drags back and forth in his car when he does extra long surveillance trips for work.  Needless to say, its a stinky boy quilt and she is not a stinky boy.  So for her birthday at the beginning of November, I pledged to make her a quilt of her own so she no longer had to resort to the stinky boy quilt.

These pretty fabrics were cut by my mom and destined for Jess.
Well, when my parents came home for Christmas, my mom helped me out by turning the stack of fabrics I had collected into a great big delicious pile of of charm squares that I could sew into a quilt. It was my mom's first time cutting fabric for a quilt.  I don't think she had fun.  She approached this project with the same get-'er-done, waste-no-time approach she takes with everything.  She was sweaty at the end.

After consultation with my mom and others, I abandoned my original plan for a selected random layout and decided to go with a gradation.  I got stuck though when I tried to figure out how to do it in a way that was balanced but that didn't have clear demarcations from one colour to the next.  Pinterest to the rescue and I found a knitting pattern I could turn upside-down and use.
This is the knitting diagram I used to plan the gradated layout
I also knew that my thumb/wrist would be on FIRE with all the pressing so I tried a new-to-me method of sewing the quilt.  I chain pieced vertically without snipping between the blocks.  Once the vertical seams were all together, the rows were pieced but the un-snipped threads held all the rows together.

See progress on vertical seams
This is the end product of having all the vertical seams sewn -- complete rows.  Rows are held together by thread. 
The great thing about piecing this way was that when I got to this point, I no longer had to pay attention to what went where.  In fact, once I got to this point, I didn't have to get up from my sewing machine at all until the top was completely pieced.  How efficient!  It was super easy to ease the seams to nest into each other and I didn't have to pay attention to which rows needed to be pressed in which direction.
See?  Ironed the whole thing all at the end.  

I would definitely use this method again if I was doing simple patchwork. Less thinking, more sewing!
This is what the top looked like once it was pressed the one and only time I took it to the iron.
I ended up backing the quilt in minky -- it was my first time doing that too.  It was a little persnickety as the backing had stretch and the front didn't but after one small re-baste to pull the backing tighter, we were in business.  I kept the quilting simple and echoed 1/4 inch away from each seam.  The quilt was machine-bound and gifted at the beginning of the month.  

Tada!  
There you have it -- The Bee Tranquilt

Wednesday 3 January 2018

2017 - A year in review

So pretty good year in the creative department considering I have been in thumb jail for the last four months.  It feels good also to track my progress.  I had no stated quilty goals for 2017 so everything on my list here puts me over and above all expectation!  Lol.

I'm breaking things into sections for this review...

New Skills:
I like to set myself a goal to learn something new every year.  As examples, past yearly learning goals have included getting a motorcycle license, learning to knit, and taking Spanish lessons.  This year, I learned two new sewing skills.

The first was English Paper Piecing.
Not too shabby for my first attempt - with thanks to a workshop at the Workroom
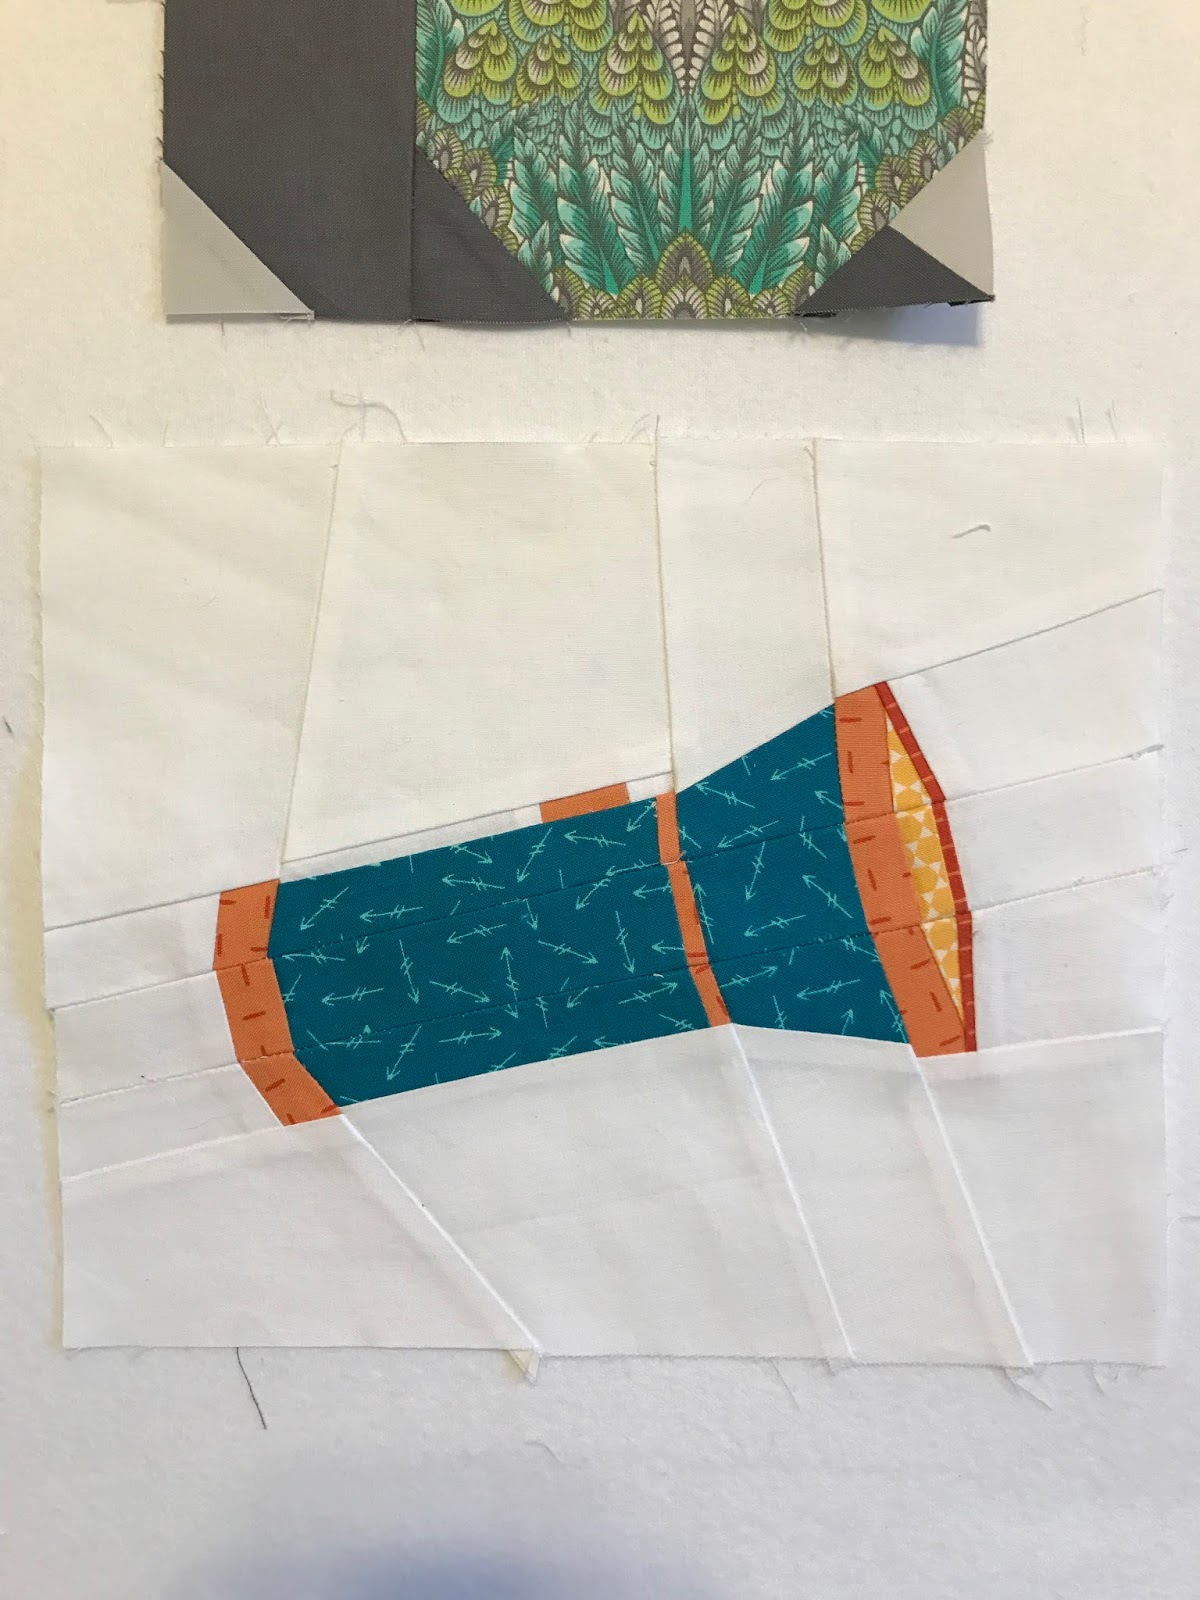
The second was to draft a Foundation Paper Pieced block:
Not a great picture but I drafted this for quilty friend A's "Shine Brightly"travelling quilt
Cushions:
These are awesome little projects to make you feel like you accomplished something in a relatively short amount of time.  In other words, great projects for a newly minted high school principal with not a lot of time on her hands.  The first was a gift.
Made this for my niece's 10th birthday - she might be more rainbow obsessed than me!
The second was my sneaky attempt to convert my brother's girlfriend into a quilter.  Note: it didn't work.
It's pretty nonetheless and gets used on the daily
The third was to use up scraps for the first quilt I was paid to make.
I couldn't waste any fabric since my friend had paid me.

Finished Quilts:
This was a pretty good eight months worth of effort.  Got a little sidelined in the fall with an injury but I will be right as rain again soon!  This was a last minute gift for a new baby boy -- got the call on Friday that I was going to get to meet him on Sunday and went to work.  36 hours later...BAM! Fast finish!

Used up some long hoarded Reunion by Sweetwater fabric and a construction print on the back that I'm not quite sure why I owned.
The second was the recently blogged birthday quilt for my friend and VP partner K-Dubs.
Oh Tula and purple - how I love you.
And the third was my long awaited aviatrix which was always destined for me and which has lived happily on my bed since it was finished.
This is still one of my favourite things I have ever made.
Other progress:
I also made a dress this year in an attempt to keep making progress on my garment sewing skills.
The Tea House Dress by Sew House Seven - obviously I used a Tula Pink fabric.
And I finished a few quilt tops which will quickly be making it into the 2018 quilty finishes column.  The first was the snail quilt I made as part of an instagram sew-a-long with my friend L.
Yet another project which heavily features Tula Pink fabrics.  Yes, I have a problem.  No, I won't do anything about it.
The second is destined for my brother's girlfriend and which WILL be a finished quilt by the time school starts again on January 8th.
I really like the gradient happening here.
And the final top - also which WILL be a finished quilt by January 8th is for the new grandson of someone who works in my school.  This little guy had a rough go in the first few weeks of life but is getting stronger every day.
Sleep Tight fabric and a quilt hack from Kitchen Table Quilts
And that's it!  

I've never set intentions for the year ahead but looking at this list of accomplishments from 2017 makes me kind of want to.  Who knows, I just may.  

Stay tuned!

Friday 15 December 2017

The birthday quilt


A while ago...like WAY back...like I've almost run out the statute of limitations on being able to blog about it...I made a quilt as a birthday present for a friend of mine.  This is no ordinary friends and this was no ordinary quilt.  Let's just say I pulled out the Tula Pink for this one.  And not any Tula Pink -- some seriously OOP Tula.  There were fabrics from "The Birds and the Bees" in there and some prints from "Parisville."  You know, long hoarded stuff that you like to pull out of the well-shaded, air-tight, plastic bins to look at and pet every once in a while.

This was step one
I knew I needed to use a pattern where there would be large swaths of the prints on view -- Tula's focal fabrics deserve nothing less.  But there also needed to be order in all the chaos -- some of her fabrics have a lot going on in a small space.  It also needed to be fast -- I was on a birthday deadline you know!  I settled on this grid of squares of varying sizes.

Used my preferred method of "selected random placement"
I worked out the quilt in halves.  I made sure there was a lot of variety and no repeats in the top and then again in the bottom.  I tried to make sure the fabrics appeared no more than once in each row and column per half.  Once the layout was checked - the sewing commenced.

Please excuse the top fluff puff of my dog's head.  I like to pretend he's admiring it.
The top actually came together pretty quickly -- I was surprised.  I guess the larger scale - which I typically don't do - makes a massive difference.  I tend toward finicky small pieces cuz I like a challenge but I may need to begin rethinking that strategy.

Finito!
And not too long after that we had a finished product.  I kept the quilting simple and sewed lines a quarter-inch on either side of each seam in a light purple thread.  It's super soft and drapey and really purpley (squeee!).

I really like these sort of hidden treasures she puts in her fabrics

And of course the requisite "Quilt - Fully laid out" shot had to be taken!
You can pretty tell how long ago this was because it looks like late winter/early spring. All this colour made me feel springy though.
And the back is purpley too!
For the back I used a large piece of a print from Amy Butler's Love that I had laying around and supplemented it with yardage of Chain-mail from Tula's Elizabeth line.  Confession, I wasn't that sold on that chain-mail fabric when I first got it so I didn't get that much.  After I used it here I fell in love with it and bought about three more metres.  Lol.

Fun label!
I'm not that great at labelling my quilts so I got these pre-made ones and just add the date to them with a micron pen.  Perfect!

All ready to gift!

Thursday 7 December 2017

The Hundred Days Odyssey continues

I was looking back through all the photos I took of this challenge and realized, as I was going through, that a lot of life occurred between the beginning and the end of this project.  The one thing I am super grateful for through the four months this took, is that doing it as an Instagram sew-a-long challenge means that I have progress shots of every single step of the process -- from the book and the fabric selection to the final layout.  Its kind of cool.  AND, even more cool is the fact that between house-sitting, and a trip to Europe, I was able to keep pace and do the whole challenge on track.  For realz.  100 days and 100 blocks.  Let's just not focus on what has happened since the 100 days ended.  

I took a look through the archive and pulled out a couple of my favourites from the whole 100.  It was hard to choose.  Check it out:

This is one of my favourite blocks from the challenge.  I really love Alison Glass focal prints and this mustard yellow is so rich I can almost taste it.

Each block isn't a lot of intense work in and of itself but if you choose the right fabrics, there's so much going on in each.

I really like how I was able to mix collections together - both new and old  - it makes the quilt a time line of my collection.

There are some pieces in some of the blocks (like this one) that represent the last tiny scraps I have of a particular fabric in a specific colour way.
I'm not gonna lie, when the challenge was over and I looked at the collection of BRIGHT and INTENSELY saturated blocks I had made, I was worried that I wouldn't be able to make a coherent quilt.  Naturally, the only solution was to create a photo-mosaic to see what I had and if it would work.  Happy to report (as you can see below) that somehow the mish-mash of intensity translates into an actual thing.  Yay!

My photo mosaic of my blocks....er...at least 81 of them.
As I transitioned into thumb jail at the end of the summer, I took to actually laying out my blocks the way I think I want them to appear in the final quilt layout.  While the disorder above show me that it will actually work, I need a bit more structure in my life.  Perhaps a little rainbow colour order structure...

You guys!  All the heart eyes for this!
And one last thing...

Doughnuts.

These are the most sinfully delicious doughnuts I've ever had.  

Daddy O Doughnuts peeps.  Yum.  

Friday 1 December 2017

100 Days 100 Blocks challenge 2017

Alright, so not so much blogging happened in the last little (okay long) while.  Because Instagram is so... instant! I can get on Instagram anywhere and blogging requires me sitting with my laptop. 

But - there was craploads of sewing!  And there's no better time than the time you're in thumb jail to catch up.  I bring you the first instalment of my 100 Days 100 Blocks Challenge!  So Gnome Angel hosted an Instagram challenge under the hashtag #100days100blocks2017 which you can read about here. It was the second time she ran the challenge and as I had seen all the goodness from the previous year, I decided to take the plunge in 2017.  If you are up for a project, she is doing it again in 2018 -- you can check out her blog for more information.  Anyhoo, since I already had the book and since I have more fabric than sense, this seemed like the perfect idea. 
The sew-a-long required you to have Tula's book
There was some lead up to the kick-off so there was plenty of time to choose the right fabric and map out times to sew to get ahead so I could compensate for the busier times.  Step one was to decide what fabric to use.  I have amassed a ridiculous collection of Alison Glass fabrics so I pulled out the stash and decided to dive in. 
Sadly (or not), this stack represents only half of my Alison Glass collection - there is another big plastic bin which I also pulled from.
I kept the colour scheme as consistent as I could with the original blocks in the book because I liked one of the rainbow colour order layouts that is included at the back of the book and wanted to get a similar effect in my finished quilt.  I even threw in a piece or two of my very valuable Tula stash along the way as an homage to the original quilt designer. 
Block one done -- see?  Similar colours, but different fabric designer.
This quilt was captivating to make and I was able to get a lot of blocks off the ground quickly.  Each block is different and the sections of books are broken into block types or "themes."  Because each block is different, each daily finish felt like a real accomplishment.  Also, the super saturated Alison Glass colours made me super happy to look at on the daily.  Adding them to the design wall in my sewing room made me happy.  I may have zoned out a time or two just staring at the rainbowy goodness.
These block made my design wall so happy and bright.
So, before I could bat an eyelash, the first ten blocks were done -- I created my own hasthtag #crissas100blocks, so I could keep easy track of my blocks in the sea of thousands of others that were being posted from all over.  The sew-a-long had prizes for each set of ten blocks that got finished so there was lots of extrinsic motivation to keep up as well.  I also created a separate album in my phone so I could see all the rainbowy goodness whenever I wanted.
My first ten blocks!
Next time I will show you my progress and where I ended up.  Do you think I was able to keep pace with the challenge?

Tuesday 28 November 2017

I still can't sew

Okay, I can admit it - I'm not a laid back or easy-going person generally.  I'm a planner and there is a lot of intentionality in the things that I do.  However, I didn't know that this "uptightness" translated into areas of my life beyond work and into the actual way I hold and use my body.  Apparently it does.  Apparently there is a lot of intentionality in the way I hold things like pens, and my phone, and the steering wheel of my car, and my rotary cutter.  And that intentionality is that I death-grip everything all of the time to choke the life force out of it.

Hence....thumb jail.

Sigh.

Thumb jail

Thumb jail is attempting to rectify tendinitis in my thumb and so far it's been three and a half months. There's been physio, acupuncture and massage three times a week since October but it doesn't seem to be getting much better.  Last night. my physiotherapist finally gave up (temporarily) -- time to bring in the bigger guns -- so back to the doctor and onto the next step.  Meanwhile, my thumb is on lock and I can't sew.

However, before thumb jail I had a really rad spring and summer and sewed all of the things...which actually might explain why I need thumb jail in the first place.

One of the things I did was finally replace my old, stained, and burnt ironing board cover.  I feel it prudent to add that I had no idea what the hell I was doing and reverse engineered it by taking apart the old cover.  Lol.
Step one: un-sew
Step one: take apart the old gross one.  I normally would question why someone would serge the old blue and yellow fabric cover with bright purple thread but in this instance was totally grateful for the contrast.  Also, I'm pretty sure my grandma made this cover and I'm not in the habit of taking my own life in my hands so I have ZERO questions.  Zero.  Do you hear me, Nan?  None.

Elastic.
Figure out how the fasteners were attached.
Once I had it all taken apart (and then panicked because I wasn't sure I could put something similar back together). I used the old bits as pattern pieces for the new bits and went to town.  All in all, a pretty quick project and now I can iron without fear that I will catch the iron on the lip of a hole and tear a ten-inch gash in the old, brittle, burnt fabric.  Sure makes things go faster.
Excuse the terrible lighting but here is the new and improved cover!
Not too shabby if I do say so myself!